|
When I first received my
Food
Fight,
controller movement was super tight. Upon
inspection I realized the tight movement was because
the previous owner had rigged some cable ties to
keep broken linkages together. After replacing
those linkages with some high quality reproductions
(see below) the controller then reacted very sloppily and it didn't spring
back to center like it should have, so I proceeded
to take it apart and rebuild it so that I could play
the game the way it was intended to be played.
The joystick is now very responsive: the movement of
Charley Chuck is very sharp and aiming and throwing
food is really precise (this is all a sharp contrast
to how it reacted before the rebuild).
|
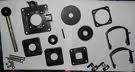
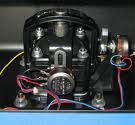
As you can see below, the
analog controller consists of numerous, mostly
plastic, parts: |
|
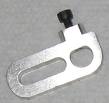
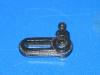
One of the main things to crack first are
the plastic linkages. A collector
named
Larry Carpenter made a batch of awesome
repro linkages awhile back. I
installed them on my Food Fight stick, and
also my Red Baron stick as well. I
believe a few sets are still available for
purchase at
Videogameparts.com. They look like this:
|
This is what the original plastic linkage looks like
(picture borrowed from
www.videogameparts.com):
|
Collector
Mark Davidson
also made some repro linkages but they're
square, and a good collector friend of mine
bought some of them and he said that they
work just fine:
|
|
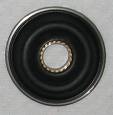
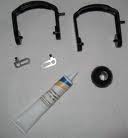
The
centering bellows also end up crumbling due to wear
and tear (and age) and thus the stick no longer
centers correctly. This is a new old stock ("NOS")
bellows. |
|
Some people that own Food Fights aren't
concerned if the stick centers perfectly.
For me, I'm used to it springing back to
center when it's let go of and I score
higher with a good bellows in place. I
got a few of these off eBay awhile back and
there are some available here as well:
http://www.videogameparts.com/category.sc?categoryId=27
Tom Wisnionski
made some repro bellows
which are a bit stiff, but Stephen Beall of
Videogameparts.com came up with a good idea
to loosen them up a bit by drilling some small
holes into it: |
|
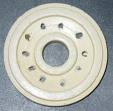
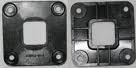
Another thing that goes is the square
control plate. It's hard to tell from the
picture below of this one, but it's already
started to crack in a few places:
|
|
In time, it will end up looking like this: |
|
Atari
offered joystick rebuild kits back in the
day. All their rebuild parts were made
of white plastic, and were MUCH stronger and
durable than the original black plastic
parts.
|
|
Here's
a close-up of what the new and improved
square control plate looks like:
|
|
It's
hard to tell from this picture due to the
flash, but hopefully you can see how
fortified the perimeter of the hole on the
upgraded white plastic part is compared to
old version: |
|
Gimbals (both the 'outer' and the 'inner')
also can crack and break over time.
Videogameparts.com has some, and they pop up
on eBay from time to time as well.
Good lubrication is also vital. If you
read the Food Fight manual you will see the
name "Nyogel 779" mentioned. This
lubricant is still being produced and is
available from Nye Lubricants. The
manual directs you to lubricate the inner
part of both gimbals, the linkages, and the
entire pivot ball. All of these parts
are shown below: |
|
 |
|
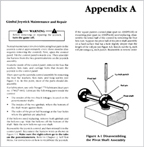
*NOTE*
to get the pivot ball out, you will have to
use a vise (or similar) as there is a metal
pin keeping that ball in place, and you'll
have to use a tap and hammer to ease it out
of there (the pin on mine was in there
pretty strongly). You can also make
your own device to aid in the pin removal by
getting a small piece of wood and drilling a
hole through out. Refer to Appendix A
below (taken from the Fight Fight manual):
CLICK IMAGE TO ENLARGE
Here's a picture taken after the ball and
the pin were put back in place. The
ball was lubed, and you can see that I
replaced the square control plate on this
unit: |
|
And here's the stick fully assembled: |
|
And finally installed back on the control
panel:
|

HOME

|